Global Payments - Payfields
How to set up Payfields?
- Go to the gear icon
- Click on app settings
- look for CreditCardProcessor
- Enter the value GlobalPayfields
- Save& Close

Set up the merchant:
- Go to the gear icon
- Click on Business Units
- Click on Create Merchant
- Click New to add new merchant information or click on the pencil icon next to an existing merchant to edit.
- Enter required information
- Save & Close

Assign a merchant to a unit:
- Go to the gear icon
- Click on Business Units
- Click on Set up Merchant per unit
- Click New to add new unit or click on the pencil icon next to an existing unit to edit.
- Select unit name and merchant name
- Save & Close

How do I Process a Credit Card?
To add a Credit Card or process a payment, you should start with the Customer Sales & Marketing Window:
Option 1: From the Customer Window(s):
- Go to Sales & Marketing > Customer CRM > Customer Sales & Marketing > Customer Sales & Marketing Management
- Select the customer you want to add/edit the credit card to.
- Click on the Pencil Icon
- On the Billing tab, go to payment information

(These fields are Read-Only and will be populated from the Add/Edit Card Info button results.)
- Click on “Add/Edit Card Info”. The window below will appear if you are using OpenEdge/Global Payments (our most common provider).
- Enter the information into the secure window and click “Submit”. You will see a response window with a “Success” or “Failure” response.
- Upon completion, close the response window. You will see the information populated into the “Review Credit Card” section along with the “IsToken” box checked, if its not checked there is likely a problem with the authorization
Now you have set up this customer for future uses. In fact, you have the option to Sync the credit card to Events.
Or we can enter the same information from the Event Window
- On the side panel, click Sales and Marketing
- Access to Event & Order Management
- Click on one of the Event Management options to select the event or use the Quick Event Lookup and enter the event ID number.
- Once you have selected the desired event, click on the "Billing" tab click on the Payment Information section

Repeat the above steps if necessary or use “Sync From Customer” pull the information into the event.
To process a credit card:
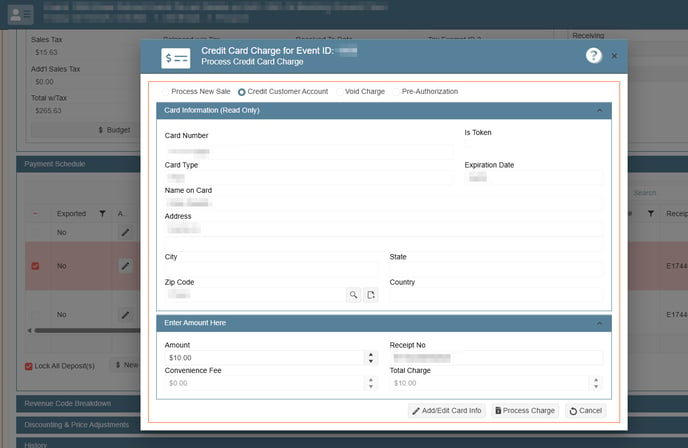
- Click on Process Credit Card.
- Select the action you want to perform:
- Process New Sale.
- Credit Customer Account.
- Void Charge.
- Pre-Authorization.
- Click on Add/Edit Card Info.
- Enter the card information.
- Click Submit.
- Enter the amount you want to charge.
- Click on Process Charge.


Processing a refund:
- On the side panel go to Sales & Marketing
- Select Event & Order Management
- Select any of the Event Management options
- Select the event you want to refund
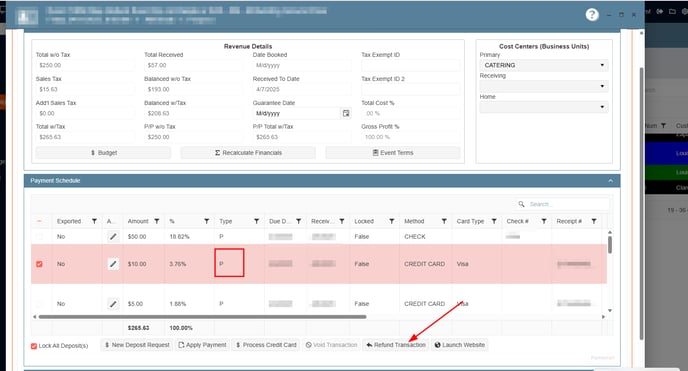
- Select the "Financial" tab
- Expand the "Payment Schedule" section
- Select a payment. The payments that have been made on an event are Type "P"

8. Click on the "Refund Transaction" button

9. Click on the "Process Charge" button at the button right side
Processing a void:
- On the side panel go to Sales & Marketing
- Select Event & Order Management
- Select any of the Event Management options
- Select the event you want to void
- Select the "Financial" tab
- Expand the "Payment Schedule" section
- Select a payment. The payments that have been made on an event are Type "P"
- Click void

- click process charge

