1. Identifying the windows to add the column of the units for the rest 20 columns (Second Part of #6324):
It was provided a draft list of the different windows to add the unit columns related with the entities: Event, Recipes, Equipment, Beverages and Staff.


2. Synchronizing the tables of Empower to the Postgres shopping cart database:
The following areas were synchronized: Recipe, Equipment, Customer and Availability Schedule. After editing a recipe and enabling the web order filed, the user can add items to that section and then to the Shopping Cart. Validation of the external API flow so it does not affect Empower´s behavior.
1. On the left side panel, go to Data Items
2. Click on Food Management
3. Click on Recipe Management (Active Items Only)
4. Select an item and go to Web Details tab
5. The Web Enabled tab needs to be ON.


3. Adjusting the dates in the Event Delivery Dates for Food Delivery, Equipment Delivery and Pickup:
In the Event Management window, changing the event date triggers a pop-up asking to update the ¨Event Delivery Dates¨, previously if the user changes the event date from the 25th to 27th, the Food Delivery, Equipment Delivery and Pickup time won´t automatically update to the new date. Now the system automatically updates the date.
1. On the left side panel, go to Sales & Marketing
2. Click on Event & Order Management
3. Select Create New Event Orders
4. Fill in the necessary information, select the event´s date, then the app will display a pop up showing the delivery dates for each category.

4. Increasing the recipes- diet- type field varchar (512):
It was increased the recipes-diet- type field to 512.
1. On the left side panel, go to Data Items
2. Select Food Management
3. Click on Recipe Management Active Items Only
4. In the Recipe tab, scroll down and go to Recipe Serves & Production Rules
5. Into this window you will the Dietary Restrictions field

5. Hiding the ¨Create and Edit Container Types¨ option in the Recipe Setup Window:
For Elior request, the Create and Edit Container Types was hide.
1. On the left hand side, click on General Setup
2. Click on Recipe
3. On the right you will see an option called "Create and Edit Container Types" - this is the window (151) that was hide.


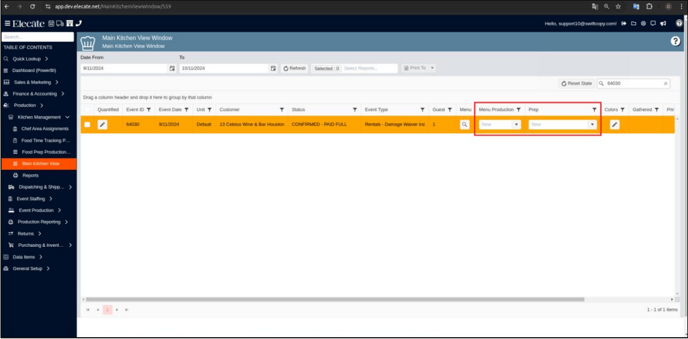
6. Creating a new status and flow between the Menu Prep Window and the Main Kitchen View:
The culinary user can change the Prep column status by selecting the ¨Pre In-Process¨ option from the Main Kitchen View. Additionally, when they open the Menu Prep Window the Prep status will change to ¨Prep In-Process¨.
1. On the left hand side click Production
2. Click Kitchen Management
3. Click Main Kitchen View
4. When the Menu Production Column shows “In-Production”, the Prep column should show “Prep In-Process”

7. Adding a new option called ¨Save and Prep Complete¨ that will be located in the menu Prep Window and this will be connected to the ¨Prep Complete¨ status in the Main Kitchen View:
The Menu Prep Window save button drop down from the save button was renamed to ¨Save & Prep Complete¨, if the ¨Save & Prep complete¨ button is selected the Prep column status on the Main Kitchen View will show as ¨Prep Complete¨, additionally culinary users can also change the Prep column status to ¨Prep Complete¨ by clicking the option on the dropdown menu.
1. On the left side panel, go to Production
2. Click on Main Kitchen View
3. Move the bar to the right, there you will find the column Prep Completed


8. Creating a dropdown option under the Menu column called Ready for Invoicing:
It was created a new status called ¨Ready for invoicing¨ and this was implemented in the Main Kitchen View Window under the Menu Production Column, additionally when a culinary user selects the ¨Ready for Invoicing¨ status on a given event from the Main Kitchen View, the status will change automatically, the new option will be displayed on the dropdown menu.
1. On the left side panel, select Production
2. Click on Kitchen Management
3. Select Main Kitchen View
4. Under Menu Production column, you will find the dropdown menu with the Ready for Invoicing status.

9. Creating a new Pop-up message to prevent the user from making any changes in the Menu Prep Window:
When a second culinary user attempts to open the Menu Prep Window for a specific event, an error message should appear, preventing any modifications to that event.
1. On the left hand side, click Production
2. Click Kitchen Management
3. Click Main Kitchen View
4. Click the pencil to open the Menu Prep Window
5. If a second user opens the same event window, a pop up appears

10. Adding the N/A option into the drop-down menu located in the Main Kitchen View Window:
When the Menu status is set to N/A on the sales side, it should automatically update to N/A on the main kitchen window as well.
1. On the left side panel, go to Sales & Marketing
2. Click on Event & Order Management
3. Select Main Sales View Window
4. On the Menu column, select the dropdown and click on N/A


11. Adding the PK column from Appsetting Window in Setup Client Tool:
It was added the PK column in the Organization Management Window into the Setup Client Appsetting Window.
1. At the top of the screen, on the right side you will see the Gear Icon
2. Click on the Gear Icon
3. Select Setup Client (second page)
4. Choose Company Setup
5. Go to App Settings - Report Server Configuration

12. Selecting recipes from the recipe database in the recipe Prep Information Window:
Whenever the user begins filling in the Prep Item field in the Recipe Prep Information window, the app will automatically complete the Recipe Name.
1. On the left side panel, go to Data Items
2. Click on Food Management
3. Select Recipe Management (Active Items Only)
4. Choose an item by clicking on the pen icon
5. Go to Recipe Prep tab and press on add New

13. Enabling for the user to overwrite the total cost field of a recipe:
The total cost field on the recipe information needs to be editable without
breaking the logic of the price adjustment that will be added as an “ingredient”.
1. Data Items
2. Food Management
3. Recipe Mangement (All Items)
4. Click the Pencil to open a recipe
5. Click the Pricing Tab
- The total cost field can now be overwritten.
- The logic doesn't break because the system now automatically adds the "difference" in an ingredient called "Cost Adjustment"

14. Creating a new Main Staffing View Window:
It was created a Main Staffing View, also the following columns were created: Selection Box, pencil (this should open the staff order), Event ID, Event Date, Unit, Customer, Status, Event Type, Event Location (This is an addition to the existing columns in the other Main Views), Guest Count, Staffing Order Status (note - this will connect to lock status and change request), Staff Count and Change Requests.
The column should display the total number of Skill Type positions requested alongside the total number of Confirmed Event Workers, formatted as a fraction (e.g., 12 positions requested, and 5 workers confirmed would be shown as 12/5).
1. On the left side panel, go to Production
2. Click on Event Staffing
3. Select Main Staffing View
4. Choose an event ID


15. Creating a new Proposal Tab Screen within the Event Modal:
It was added a new tab on the event screen called ¨Proposal¨, into the proposal tab we have the following columns: Item, Description, Quantity, Price and Total, there is a print button on the bottom left-hand side and the option to delete each line is available via the trashcan icon.


16. Implementing new changes in the Kitchen Questionnaire window (Site Menu):
The Kitchen Questionnaire screen exists and has editable fields via app settings. The columns available are Question, Quantity, Yes/No, Notes. When a sales user sends their recipe order to the kitchen, a Kitchen Questionnaire pops up and the questions must be answered before they can hit save & submit. The On-Site Kitchen Info button is renamed Kitchen Questionnaire. The button opens a read only version of the Kitchen Questionnaire.
1. On the left side panel, go to Sales & Marketing
2. Click on Event & Order Management
3. Select Main Sales View
4. Click the pencil icon on any event
5. Event order details tab
6. Click the third icon from the left (post it note looking) above the details of any order to access the Event Item Notes page

17. Adding the ability to edit a recipe in the Menu Prep Window:
Adding an edit button to the Menu Prep Window, it will allow to modify the recipe.
1. On the left side panel, go to Production
2. Select on Main Kitchen View
3. Click the pencil on any event to open the Menu Prep Window

18. Implementing the standard save drop down button menu in the Reseller Tax Certificates Screen:
Adding a separate button to preview the Reseller Tax Certificate and the Save
button to follow the logic across the app.
1. Go to "Finance & Accounting"
2. Go to "Customer Financials"
3. Click on "Customer Financials"
4. Click on "Customer Financial Management"
5. Double-click on the customer that you want to edit
6. Go to "Certificates" tab
7. In the "Upload Tax Certificates" section click on "Add" button to add a new certificate
8. See the referenced button in the bottom right hand corner

19. Adding the Organization field into the Lead/Prospect Information Screen:
The organization field is now part of the contact name section in the Lead/Prospect Information window. A new column will be added to the Customer Organization table to link prospect information (not visible in the UI). The customer organization control (Multicolumn Combo Box) will be integrated into the lead prospect management editor, allowing users to search for, save, and populate organizations. New prospect organizations added by users will not appear in the customer marketing organization field.
1. On the left side panel, go to Sales & Marketing
2. Click on Customer (CRM)
3. Choose Lead/Prospect
4. Create a new Lead/Prospect


20. Increasing the Prep Area´s field size to ve varchar (512):
It was increased the field size of the Prep Area to be varchar (512).
-
Click Data Items
-
Click Food Management
-
Click Recipe Management (All Items)
-
Click the pencil next to a given item
-
Go to the Recipe Prep tab
-
Click the pencil on a given item
-
Navigate to the Prep Area drop down – this is the field that needs to be increased and made multiselect.
OR -
Go to Data Items
-
Click Food Management
-
Choose Recipe Management (all items)
-
Click the pencil next to a given item
-
Go to the Additional Info tab
-
See Prep Area drop down- this is the field that needs to be increased and made multiselect.


21. Selecting multiple options under the Prep area field:
Adding a dropdown in the Recipe Prep Information section, so the user can play with the different options in the dropdown menu.
1. Click Data Items
2. Click Food Management
3. Click Recipe Management (All Items)
4. Click the pencil next to a given item
5. Go to the Recipe Prep tab
6. Click the pencil on a given item
7. Navigate to the Prep Area drop down – this is the field that needs to be made multiselect.

22. Modifying the window in the Main Kitchen view that appears when a new change request is pending to be accepted or rejected:
Every time a user accesses the Kitchen Main View, if there is a pending change request, it should appear and filter recipes originating from that request.
When the status in the Menu Production column on the Main Kitchen View is one of the following, and the Menu is locked for sales users, a change request is required for Sales Users to adjust the menu
- In-Process
- In-Production
- Submitted
- N/A
- Sales users then click on the drop down under the Change Req column on the Main Sales View window
After filling out the change request for recipes and hitting submit, we need a pop up to appear on the Main Kitchen View Window.
Then
- There should be a pop up that appears every time a user navigates to the Main Kitchen View, and there is a change request that has not been accepted or rejected
- The pop up should contain the following information, as shown in the mockup*
- All events with submitted, unaddressed change requests, in chronological order of the event date (soonest event at the top, furthest even out at the bottom)
- The pop up should contain:
-
-
Pencil Icon, that takes the kitchen user to review the request and either accept it or reject it (KA Question – did we develop the accept/reject part?)
-
The Event ID number
-
The event Date
-
A preview of the comments, which come from the Change Request Screen
If there is not a change request to review, there won’t be any pop up at all
-

23. Enabling for a staff admin to assign multiple workers to a given skill type by groups:
The user is able to quickly assign multiple workers to a given skill type.
1. Go to Production
2. Click on Event Staffing
3. Select Staff production scheduling
4. Click the orange square on the calendar, then events will appear on the right-hand side
5. Double click on one of those events, this will open the Staff Production Scheduling by Event screen
6. Clicking refresh on the event requirements on the left of this screen will generate a list of staff


24. Creating a new Main Production Screen in the Elecate App:
In the Production category, a new window called the Main Production View has been added within the event production section. The Pencil icon has been replaced with an Eyeball icon, which opens the Event Peek Reporting Window located in the Event Items Screen. Add buttons for departments (Recipe, Beverage, Equipment, Staff, Miscellaneous, On the Fly Entry) have been added at the top. The Peek window displays details of all items (Beverages, Equipment, Miscellaneous, Recipes). The Main Production View has the following columns: Selection Box, Action, Event ID, Event Date, Unit, Customer, Status, Event Type, Guest Count, Beverage Order Status, Equipment Order Status,Change Requests.


25. Ensuring the ¨Set Time¨ button uses the user´s Local Timezone and Matches the End Time to the start Timezone:
If the Start time is set in the mobile app, clicking the 'Set Time' button for the End time should calculate the time zone based on the Start time, not UTC or the User's time zone. When either 'Set Time' button is clicked, the system should correctly detect and use the user's local time zone instead of the server's time zone.
- Go to Timesheets > Timesheet Management Window
- Select an existing item or add a new one
- In the section ‘Start’ or ‘End’ click the ‘Set Time’ button
- Observe that the time displayed may differ from the user's local system time
