1. Implementing a function from WPF to Blazor, in order to prevent the overbooked on an item:
It was brought a functionality from WPF to prevent the overbooking on an item; the functionality was applied on an individual or multiple cost centers

2. NuGet Packages - Check Libraries updates Phase 5:
We have identified needed updates, measure impacts and write QA notes
3. Renaming ¨Recipe Allergens¨ field to ¨Dietary Restrictions¨:
It was renamed ¨Recipe Allergens¨ in all the existing tabs to ¨Dietary Restriction¨
1. On the left side panel, go to Data Items
2. Click on Food Management
3. Choose Recipe Management (All Items)
4. Select an existing item or create a new one by clicking on New Entry

4. Changing the ¨General Setup¨ icon sited in the side menu to an Alpha Icon:
The General Setup icon was changed, previously we had a Gear icon and now we have an Alpha icon instead.
Before:

After:
5. Adding a ¨Prev¨ and ¨Next¨ button in the staffing modal window:
It was added the ¨Prev¨ and ¨Next¨ button in the modal window while the user is at the event crud editor level.
1. On the left side panel, go to Sales & Marketing
2. Click on Event & Order Management
3. Select Event Management - All Status Types Included
4. Choose any event on that window
5. Go to order details and add staff members to the event

6. Adding a new refresh button in the Appsetting Window:
It was created a refresh button and added the same functionality (refresh) in the Appsetting, additionally the window will refresh once the user has saved an update.
1. At the top of the screen, on the right side you will see the Gear Icon
2. Click on the Gear Icon
3. Look for Appsettings
4. Select Appsettings


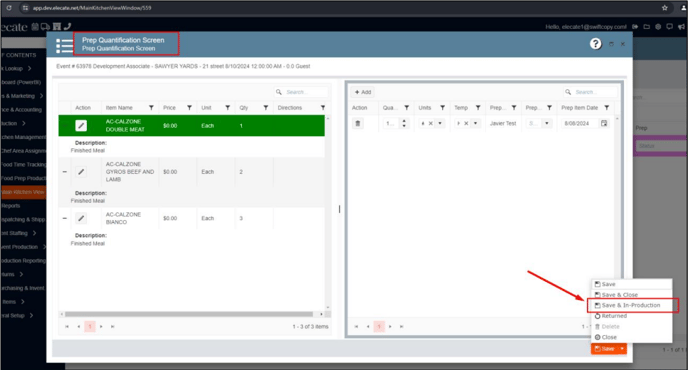
7. Adding an option to the Save button to accept kitchen sales orders and transition status from ¨Submitted¨ to ¨In Production¨:
When the Save & In-Production button is selected by the user, the status for a given event in the Menu Column on Main Sales View Window and Main Kitchen View will be automatically updated to ¨In Production¨.
1. On the left side of the panel, click on Production
2. Click Kitchen Management
3. Click Main Kitchen View
4. Click the pencil icon for any event
5. On the Save button, there needs to be a new option called “Save & In-Production”

8. Having a button on my recipe order pages to indicate that my Menu is completed and ready for the kitchen:
It was added a new arrow icon on Event Order details, by clicking on this arrow the status will be moved from ¨In-Process¨ to ¨Submitted¨, once the order is submitted the sales user will not be able to edit or add recipes. Only culinary users will be able to access the event via Production to make changes.
1. On the left side of the panel, click Sales & Marketing
2. Click Event & Order Management
3. Click Main Sales View Window
4. Click on the pencil icon for an event
5. Navigate to the Order Details Tab
6. Add the icon as shown


9. Automatically update the status in the menu columns changes from ¨New¨ to ¨In-Process¨:
When a recipe is added to an order and saved, the status in the Menu column will change from ¨New¨ to ¨In-Process¨.
1. On the left side panel, click Sales & Marketing
2. Click Event & Order Management
3. Click Main Sales View Window
4. Click on the pencil icon for an event
5. Navigate to the Order Details Tab
6. Add a Recipe to the order and click Save
7. Now the Main Sales View and Main Kitchen View will show “In-Process” in the Menu column for that event
** Recipe items added via the Menu Builder and the Event Sales Menu Window should also trigger the same outcome.**
1. On the left side of the panel, click Sales & Marketing
2. Click Event & Order Management
3. Click Main Sales View Window
4. Click on the grid icon for an event to open the Menu Builder
5. Add a Recipe to the order and click Save
7. Now the Main Sales View and Main Kitchen View will show “In-Process” in the Menu column for that event


10. Renaming one of the options on Main Kitchen View from ¨Prep InProcess¨ to ¨Prep In-Process¨:
In Main Kitchen View was renamed the option from ¨Prep InProcess¨ to ¨Prep In-Process¨.
1. Click on Production on the left side panel
2. Click on Main Kitchen View
3. Navigate to the Prep Column
4. Rename the option called "Prep InProcess" to "Prep In-Process"

11. Creating a new button to send back a sales kitchen order and move the status from ¨Submitted¨ to ¨Returned¨:
The Returned option was created in Menu Production column in the Main Kitchen View, additionally this option was included in the drop-down menu.
If the user selects the returned option from the Kitchen View window the status of the menu column will show as returned and will allow the user to make changes.
1. On the left side of the panel, click Production
2. Click Kitchen Management
3. Click Main Kitchen View
4. Click the pencil icon for any event to open the Menu Prep Window
5. On the Save button, there needs to be a new option called “Returned”
OR
1. On the left side of the panel, click Production
2. Click Kitchen Management
3. Click Main Kitchen View
4. Select “Returned” from the drop down under Menu Production
OR
1. Click on Sales and Marketing, on the left side of the panel
2. Click on Event & Order Management
3. Click on Main Sales View Window
4. Under the Menu column, Returned is now an option on the drop down


12. Creating an Appsetting to hide the rental factor field located in the equipment screen:
It was created the Appsetting ¨ShowRentalFactorField¨, this feature will show/hide the Rental Factor field on the Equipment screen, the appsetting will be available in the Synergy and Cikume environments.
1. At the top of the screen, on the right side you will find the Gear Icon
2. Click on the Gear Icon
3. Select Appsettings
4. Look for ¨ShowRentalFactorField¨
5. If the value is set to ¨Yes¨, the window will display the information.


13. Renaming the ¨Allow price change¨ to ¨Lock Price Change¨ and locking the user to edit the prices of the recipe at the event crud editor if the toggle is on:
It was renamed the ¨Allow price change¨ to ¨Lock price change¨, additionally if the toggle is on, the user won´t be able to edit the prices in event crub editor.
1. On the left side panel, go to Sales & Marketing
2. Select Event & Order Management
3. Click on Event Management - All Status Types Included
4. Choose an event and go to Order Details
5. Add an item to the event and go to Order Entry Options
