1. Creating database roles:
-
Role Creation:
- Database roles was created to define specific permissions for different users or groups.
- Each role should have a clear and descriptive name that reflects its purpose.
-
Permissions Assignment:
- Assign appropriate permissions to each role based on the required access level (e.g., read, write, execute).
- Ensure that roles are assigned the minimum necessary permissions to perform their tasks.
2. Setting On-Hand to Zero should prompt user to disabled user (Equipment Inventory):
When the user changes the value to 0 in On-Hand the system displays a warning with the following options: OK or Cancel buttons, ensuring the tracking feature is not disabling without user confirmation.
1.On the left side panel, go to Data Items
2. Click on Equipment Management
3. Select Equipment Management (Active Items Only)
4. Open an existing item by clicking on the pen icon
5. Go to the Cost Center Tab
3. Working on implement the Grid Persistence of User Settings in Event Order Items:
The user will be able to keep their preferences without losing them when they close and save the event, what kind of actions they can performance in the order details tab: filter columns, grouping departments and order the columns.
1. On the left side panel, go to Sales & Marketing
2. Click on Sales & Marketing
3. Select Event Management - All Status Types Included
4. Open an existing event by clicking on the pen icon
5. Go to the Order Details Tab

4. Wanting the preload event-related AppSettings in batch at the Event Crud level so that the module has faster and centralized access to configuration data:
It was created the event-specific Dictionary with all the AppSettings used within the Event Crud Editor modal, including the 4 calls. It was included the EventOrderDetailTreeViewNodeToExpand App Setting to avoid calling the backend to retrieve its value each time the Order Details tab is accessed.
5. Prepopulating the RoomComboBox asynchronously in the After Render method when opening the Event Editor so that the dropdown loads efficiently without blocking the UI:
It was created a store procedure to handle all the AvailableRooms initialization in one call with the needed parameters, instead of processing the data and population in the frontend.

6. Improving the TreeView component initialization in the Order Details tab so that it loads more efficiently and provides a smoother user experience:
-
Default Node from AppSettings:
- Instead of calling the API each time to determine the default node to expand in the tree, retrieve this value from the
AppSettingslist (which is populated in the event editor). - This reduces unnecessary API calls and improves performance.
- Instead of calling the API each time to determine the default node to expand in the tree, retrieve this value from the
-
Overload
LoadTreeDataAsyncMethod:- Introduce an overload of the
LoadTreeDataAsyncmethod that accepts a parameter (the default node fromAppSettings). - This overload would handle the default expansion logic internally, streamlining the code and improving maintainability.
- Introduce an overload of the

7. Wanting the "Event Item Prop Group/Section" only for Equipment & Miscellaneous:
The button that will fire up the ¨Event Item Prop Group/ Section¨ is available for the following departments: Equipment, Miscellaneous.
1. On the left side panel, go to Sales & Marketing
2. Click on Event & Order Management
3. Select Event Management - All Status Types Included
4. Open an existing event by clicking on the pen icon
5. Go to the Order Details Tab and go to the Order Review section

8. Wanting Grid Persistence on the "Event Item Prop Group/Section" modal window in order for a better UX:
The Grid Persistence appears in the “Event Item Prop Group/Section” modal window for a better UX.
1. On the left side panel, go to Sales & Marketing
2. Click on Event & Order Management
3. Select Event Management - All Status Types Included
4. Open an existing event by clicking on the pen icon
5. Go to the Order Details Tab

9. Wanting the "Save" button on the "Event Item Print" to be in accordance with our standard:
It was applied the following "Save" format to the Save button on the "Event Item Print"-
- Save & Close (Default primary button):
- Save
- Delete (per business logic)
- Close
- Save & Close (Default primary button):
1. On the left side panel, go to Sales & Marketing
2. Click on Event & Order Management
3. Select Event Management - All Status Types Included
4. Open an existing event by clicking on the pen icon
5. Go to the Order Details Tab
6. Split the items by departments, 7 new options will be displayed in the item´s name, click on Edit Item Print Option

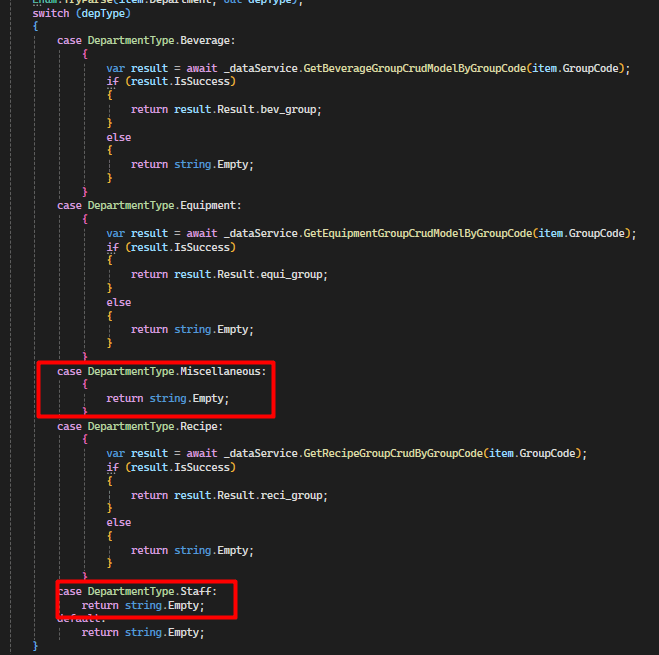
10. Wanting to improve streamline Order Item Initialization Process:
-
It was created a consolidate version of these queries in a single stored procedure that receives the department name as a parameter and returns the string value to be set in the front end, name it "usp_GetGroupCodeByDepartment"
-
It was removed the switch statement and apply a guard clause. Include the miscellaneous and staff departments in the return evaluation. These departments should also be excluded from the new stored procedure.
11. Wanting the Grid Persistence on the "Event Item Print" modal window in order for a better UX:
The Grid Persistence was applied in the ¨Event Item Print¨ modal window, in the following columns: Department, Item, Quantity, Retail Price, Print Item, Print Photo.
1. On the left side panel, go to Sales & Marketing
2. Click on Event & Order Management
3. Select Event Management - All Status Types Included
4. Open an existing event by clicking on the pen icon
5. Go to the Order Details Tab
6. Split the items by departments, 7 new options will be displayed in the item´s name, click on Edit Item Print Option

12. Creating the API Keys for the Good Food Client for Blazor:
- Deploy Good Food account in the canary group.