
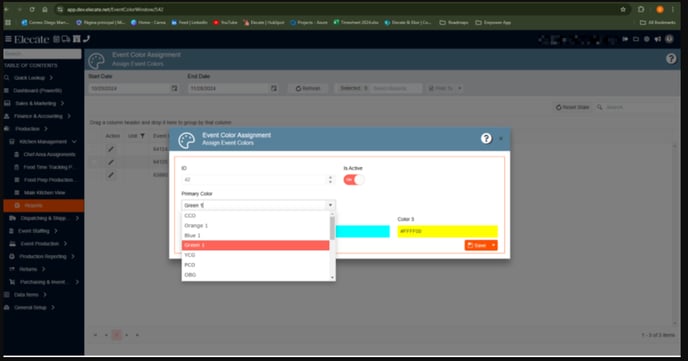
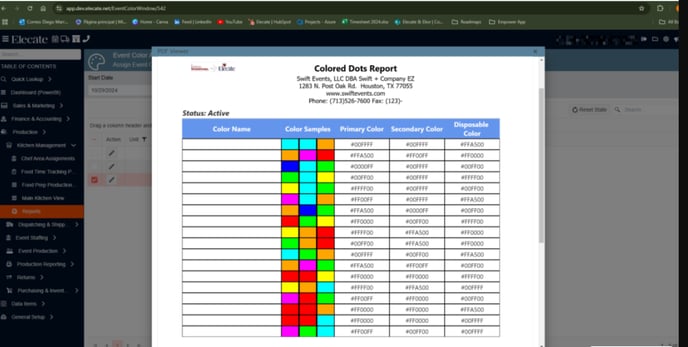
1. Being able to assign Colored Dots to each menu:
It was applied the Colored Dots functionality based on the reports that have been attach in this story.
1. On the left side panel, go to Production
2. Click on Kitchen Management
3. Choose Reports
4. Select Event Color Assignment

2. Building the remaining DB´s with the units:
We added the remaining DB´s with the units.
3. Implementing new reports: Event Revenue Discrepancy Total Amount and the Revenue Section Subtotal Amount Reports:
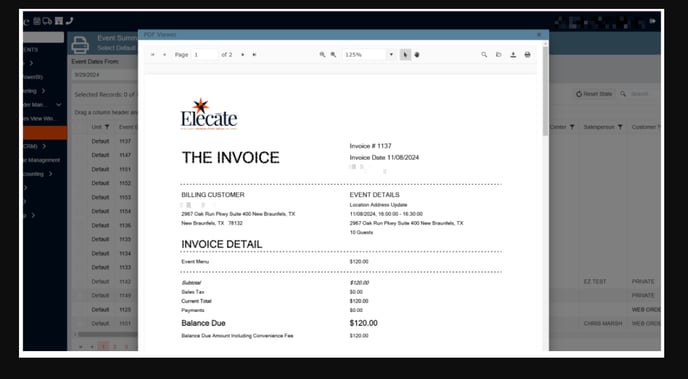
A new report has been created to show the difference between the total in the Proposal screen and the total of the actual items ordered.
Report Header:
- Report Name
- Date Range Searched
- Business Unit Selected
Report Body Columns (left to right):
- Event ID
- Event Name
- Event Date
- Salesperson's Name
- Revenue Order (stand-alone column for each Department/Code)
- Revenue Estimate (stand-alone column for each Estimate Screen Revenue Section)
- Event Order Screen Total
- Event Estimate Screen Subtotal
- Discrepancy between Event Order Total and Estimate Screen Subtotal
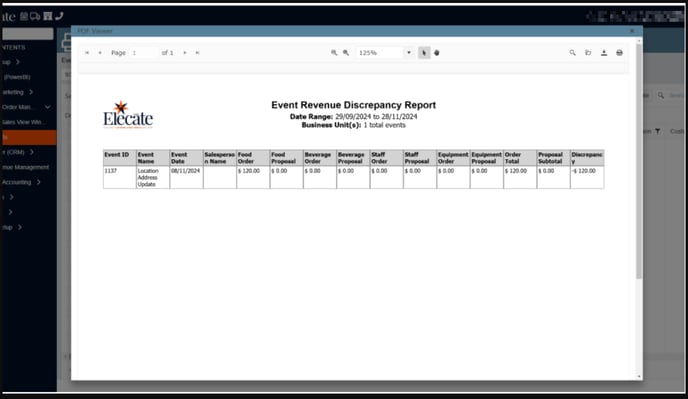
4. Implementing new reports: Event Revenue Discrepancy Total Amount and the Revenue Section Subtotal Amount Reports:
A new report has been created to show the difference between the total in the Proposal screen and the total of the actual items ordered.
Report Details:
- Revenue Column: Pulls the amount for each Revenue Department from the Event Order Screen.
- Revenue Estimate Column: Pulls the subtotal amount for each Revenue Section from the event's Estimate Screen.
- Package Price Revenue Section: Excluded from this report.
- Subtotal Amount: Derived from individual Revenue Sections only.
- Discrepancy Field: Calculated as the Event Estimate Screen Subtotal minus the Order Screen Total. Negative values will appear in parentheses.
- Auto-Sorting: The report will automatically sort by Event Date.

5. Implementing the PACE report:
It was created the PACE report adding all the columns and elements shown in the description Screenshot.
1. On the left side panel, go to Finance & Accounting
2. Click on Financial Reports
3. Select Financial Revenue Reporting
4. Click on Refresh, then in the dropdown menu look for the report Pace Report

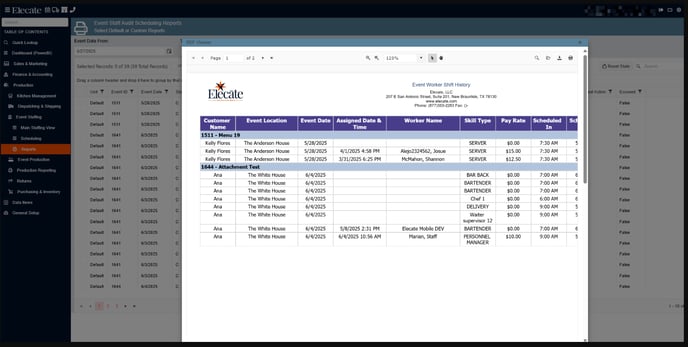
6. Creating a new child table for the event staff to log the status of each event:
A new child table with the five add on has been created.
1. On the left side panel, go to Production
2. Click on Event Staffing
3. Select Reports
4. Choose Event Staff Audit Scheduling Reports
5. Press Refresh, then go to the dropdown menu and click on Event Worker Shift History
7. Creating a customer statement report:
Two new custom reports have been created that have specific revenue code line items.
1. On the left side panel, go to Sales & Marketing
2. Click on Event & Order Management
3. Select Reports
4. Choose Event Summary Reporting
5. Press Refresh, then look for the report Customer Statement Report
8. Adding new user roles names "Mid Ops" and "Mid Sales" to the user roles:
Two new user roles have been created - Mid Ops and Mid Sales.
9. Changing status after submitting the order in the equipment column in the Main Production and Main Sales view windows:
Once a sales user has submitted their equipment order, the equipment column of the Main Sales View and Main Production View should reflect submitted.
1. On the left side panel, go to Sales & Marketing
2. Click on Event & Order Management
3. Choose Main Sales View Window
OR
4. Go to Production
5. Click on Event Production
6. Select Main Production View
Both windows “Main Sales View Window” and “Main Production View Window” are in “In-Process” status:
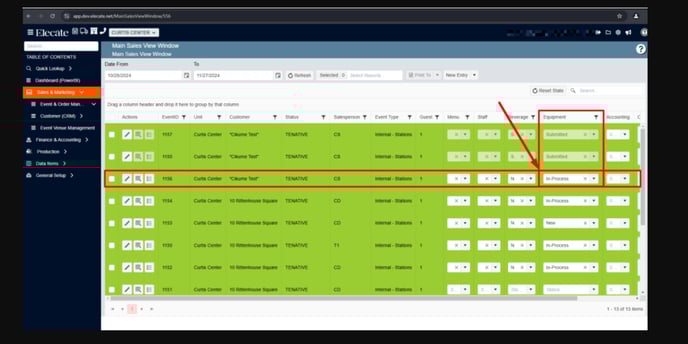
Submitting the Equipment Order:

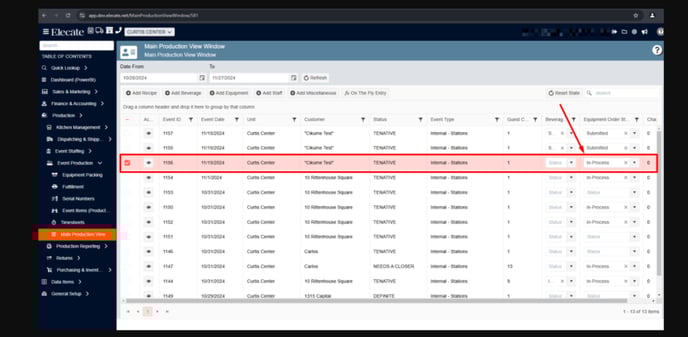
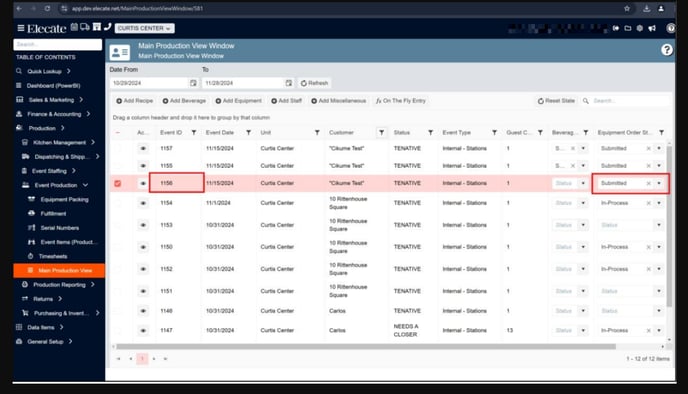
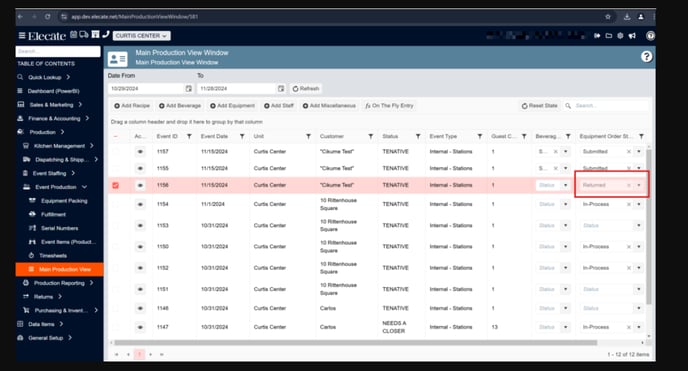
10. Being able to change the status of any equipment order returned on the Main Production view:
The users will be able to change the status of an equipment order from the Main Production view screen by changing it to returned; by returning the order, the Sales user can edit their order again.
1. On the left side panel, go to Production
2. Click on Event Production
3. Select Main Production View
4. User changes the status in the Equipment column to the status of returned
11. Creating a new way to nest items to don't show the individuals subtotals they only need to show the total price and total price per person:
A new feature allows nesting revenue code line items under a header, displaying only the total price and total per person price, without individual subtotals. Users can add detailed line items total up to the overarching revenue line of a given revenue code.
When a revenue department is selected, the drop-down options in the "Item" section are restricted to specific choices. For example:
- Selecting "Food" will show options like burgers and chicken.
- Selecting "Beverages" will show options like water and sodas.
1. On the left side panel, go to Sales & Marketing
2. Click on Event & Order Management
3. Select Event Management - All Status Types Included
4. Open an event
5. Go to the Proposal Tab


12. Reorganizing allergens, and dietary restrictions and add a new prep calories field in the recipe editor:
The Ingredient Allergens, Prep Item Allergens, and Dietary Restrictions fields need to be moved to a line at the bottom of the Recipe Serves & Production Rules section. Additionally, a new free-type character field called "Recipe Calorie Information" should be added to allow users to enter data like "150-200 calories depending on portion size." This field should be placed wherever there is space after rearranging the other boxes, and the box around the min/max information can be made smaller to accommodate this new field. The information entered into the Recipe Calorie Information box should populate on the online portal/shopping cart.
-
On the left side panel, go to Data Items
-
Click on Food Management
-
Select Recipe Management (all items)
-
Click the pencil to open any item
- The recipe tab on the Recipe Information window is the screen we need to edit


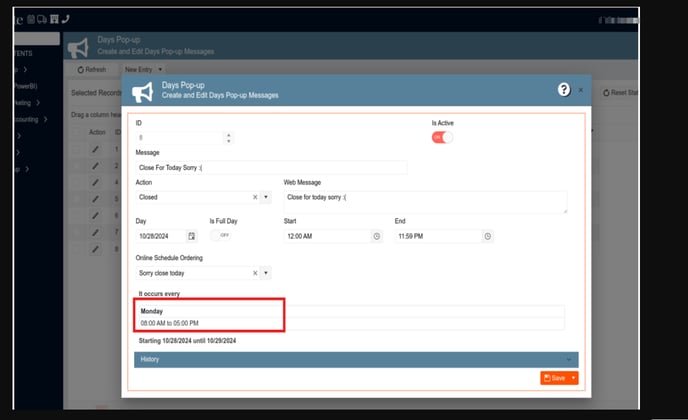
13. Implementing a new soft close logic into Empower app:
We need to link the "Delivery Schedule Table" to allow users to set the schedule according to its functionality. Additionally, users should be able to directly set an "effective date" for the date range when the soft close will take effect. The "History" section, found in various windows throughout the application, will be used as the required log. This section typically includes values for "Created by," "Edited by," "Created Date", and "Edited Date".
1. On the left side panel, go to General Set Up
2. Click on Marketing
3. Select Create & Edit Days Pop Up Messages
4. Soft close and recurring closures should be set here as well

14. Implementing a Batch Update for Editing Existing Staffing Change Requests and a quick way to add Skill Types in the Staffing change request:
Staffing change requests have the batch update logic available to edit existing requests, Staffing change requests offer a quick way to add additional skill types to an event, the following field are editable: Shift start time, shift end time, dress code, event date.
1. On the left side panel, go to Sales & Marketing
2. Select Event & Order Management
3. Click on Main Sales View
4. Navigate to the change request column and click All Change Requests
5. Select Staff in the department drop down on the top left
6. Clicks create new


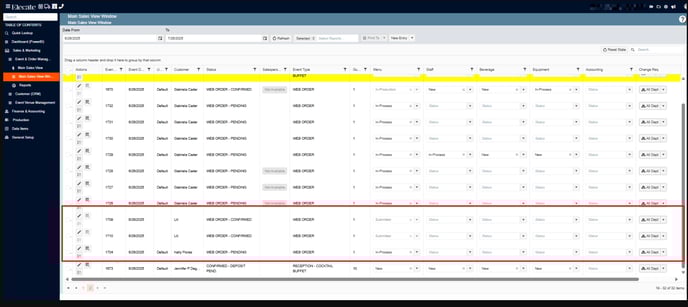
15. Making the versions not able to be adjusted after the order was put into submitted status:
Once an order has been put into submitted status, the versions for that department cannot be adjusted.
-
On the left side panel, go to Sales & Marketing
-
Click on Event & Order Management
-
Select Main Sales View
-
Open up any event - navigate to the Event Info Tab
-
On the far right click on the versions button
-
The order versions should be locked once that departments order has been submitted

16. Implementing a Drop-down menu in the Prep Area field that is located in the additional info tab:
The Preparation Area field is a multi-select type, allowing the user to select multiple options. This ensures that all areas relevant to recipe preparation can be recorded and that the information is saved correctly when the entry is completed.
1. On the left side panel, go to Data Items
2. Click on Food Management
3. Select Recipe Management (All Items)
4. Click the pencil of a recipe
5. Navigate to the Additional Info tab
6. The Prep Area field should be made multi select.

17. Adding the Money page/Estimates Page in the Proposal Tab:
A report will be generated from the Proposal Tab of an event
1. On the left side panel, go to Sales & Marketing
2. Select Event & Order Management
3. Click on Main Sales View
4. Choose Open up any event
5. Go to the Proposal Tab
6. This report will be generated here

18. Improving the disconnect handling in SignalR:
The disconnection issue shows up whenever an interruption in the network causes SignalR to stop receiving or sending the communication calls to the Server and the user experiences an "Attempting to reconnect" banner. No QA validation is needed.
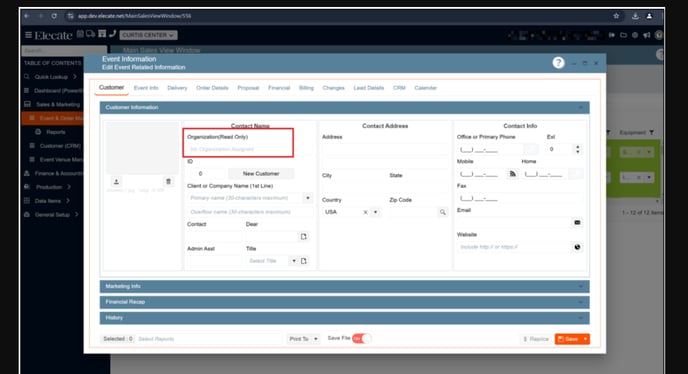
19. Implementing enhancements for organization field display across the platform:
- Organization Box: Labeled as Read Only.
- Existing Customer: If associated with an organization, it populates the read-only organization field.
- No Organization: If no organization is associated, the field shows "No Organization Assigned."
- Customer Quick Entry: Organization component added above the first client line.
- Organization Field: Not required in Customer Quick Entry.
- Auto-Population: When a new customer is created and the organization field is populated, it refreshes automatically.
1. On the left side panel, go to Sales & Marketing
2. Click on Event & Order Management
3. Choose Event Management - All Status Types Included
4. Go to the Customer Tab
Organization field is a “read only” field at the event level and Organization is displayed:
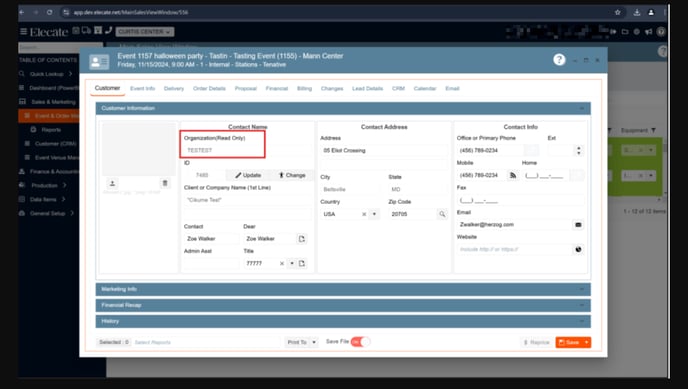
“No Organization Assigned” when the customer does not have an organization
assigned:
20. Enhancing Recipe Editor:
- The calories field has been moved to the Additional Info tab, under the Serving Info section
- Recipe Type, Dietary Restrictions, and Prep Item Allergens are in a row at the bottom of the Recipe Serves & Production Rules Section
- The Recipe Type field label has been changed to Ingredient Allergens, and the ingredient allergens should be displayed in that section.
- The Calories field was placed below the Temperature field in the Serving Group
- On the left side, panel go to Data Items
- Click on Food Management
- Select Recipe Management (all items)
- Open a recipe


21. Seeing the Equipment Groups from Empower in the Shopping Cart:
The user can now see the groups of empower teams in the shopping cart.

22. Setting the calories field as optional in the Recipe Editor:
The calorie field is not required to save the information; a template control shows instead of an empty space for Recipe Prep Allergens when no data is available.
1. On the left side panel, go to Data Items
2. Click on Food Management
3. Select Recipe Management (All Items)
4. Open a recipe, go to the Recipe Serves & Production Rules section

23. Connecting the Change request function between the Shopping Cart and the Empower:
The synch between the Shopping Cart and the Empower App related to the change Request Function is Done.
1. On the left side panel, go to Production
2. Click on Kitchen Management
3. Select Main Kitchen View
4. Go to the Change request button
Adding a new recipe item (Scones) Shopping Cart: 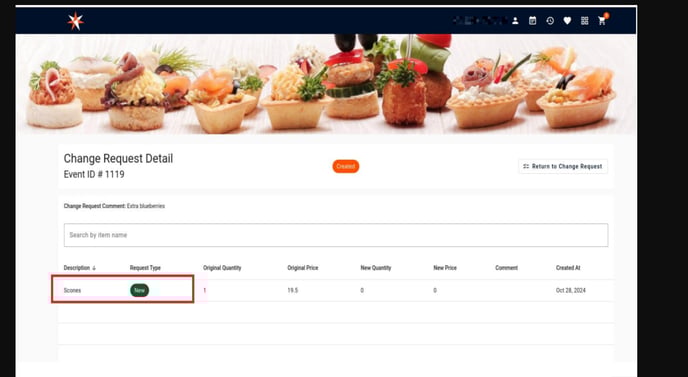
Change request waiting for approval in the Empower App:
Review and approved or reject the changes: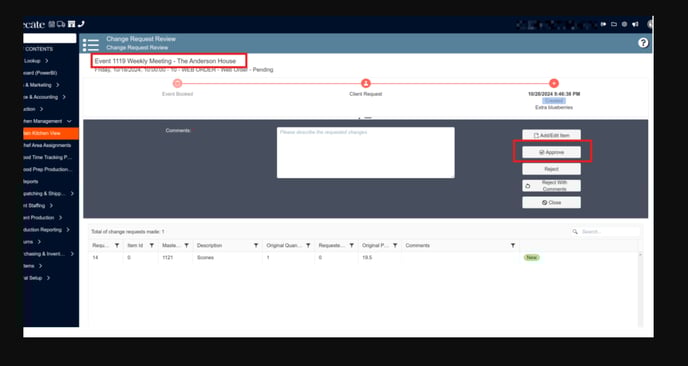
24. Changing the API URL environment variable:
Change the environment variable of the API address.