1. Having a view of the dashboard by date, similar to the desktop version:
The dashboard view should replicate the layout and design of the desktop version for consistency. Key elements include:
- Date Picker: The "Month" selector should be positioned at the top-left of the dashboard, mirroring the desktop layout.
- Refresh Button: Placed to the right of the date picker, this button will update the dashboard data.
- Status Legend: Located on the right side, it should display each status (e.g., Confirmed, Canceled, Pending) with corresponding color codes and full status names.
- Navigation & Layout: Menus, links, widgets, charts, and tables should match the structure and positioning of the desktop version.
1. On the left side panel, click on the Dashboard (PowerBI):

2. Having the ability to link customers & staff members:
- In the Staff Person Management window, add the following:
- A new tab
- The tab will be called "Customers"
- A new section in this tab called "Customers, Rooms, Suites & Venues"
- In this section, add a search bar at the top right corner
- Add a text in the back that says "Enter the customer ID"
- Add a button "Add Customer" next to the right of the search bar
- Add a button called "Remove Customer" next to the right of the "Add Customer" button
- Underneath those buttons, create 5 columns
- Customer ID
- It will show the customer ID of the customer selected
- Customer
- It will show the name of the customer
- Representative
- It will show the name of the representative (This column can be found in the off premise modal window, see screenshot above)
- Room ID
- It will show the Room ID number
- Room Name
- It will show the name of the room selected.
- Customer ID
- If the customer selected, has more than one room assigned to them, then as soon as the customer is added, a modal window will appear asking the user to select which room the staffing must be added or if to select all the rooms.
- If two or more rooms are selected, then an individual record must be added to the grid per room.
- In this section, add a search bar at the top right corner
- A new tab
- If a user selects a customer & room on the staff person management window, then that staff member must be linked over to that customer & room.
- This is in order that a customer is added to a venue and room, the customer can have their favorite server for their service as an example.
Modal Consistency on Venues & Customers:
- In the customer marketing management window, in the cost center & venues tab, we need to change the layout of the "Room, Suites & Venues" section to have the following(that will mimic what we have in the venue management, customer tab section):
- A search bar at the top left corner
- The text in the back should say "Enter room ID"
- It will allow the user to look for all the "Off" premise locations that have been selected as rooms
- Move the button "Add Room" next to the right of the search bar mentioned before.
- Move the button "Remove Room" next to the right of the "Add Room" button
- A search bar at the top left corner
1. On the left side panel, go to Sales & Marketing
2. Click on Customer (CRM)
3. Select Customer Marketing
4. Choose Customer Sales and Marketing Management
5. Open an existing customer by clicking on the pen icon
6. Go to the Cost Centers & Venues Tab
7. In the search bar, enter the Room ID then tab on Add Room

Then
1. On the left side panel, go to Data Items
2. Click on HR Management
3. Select HR Management (Active Only)
4. Open an existing staff member by clicking on the pen icon
5. Go to the Customer Tab
6. Click on the Customers, Rooms, Suites and Venues section
7. In the search bar, enter the customer ID or Name
8. Tab on Add Customer
9. From the Staff Asignen window, pick a room ID


3. Having Access to the "Operations Scheduling" section (Any users with access to events):
- Any users who can access to events, must be able to access & edit the values in the "Operations Scheduling" section within the delivery tab.
1. On the left side panel, go to Sales & Marketing
2. Click on Event & Order Management
3. Select Event Management - All Status Types Included
4. Open an existing event by clicking the pen icon
5. Go to the Delivery Tab

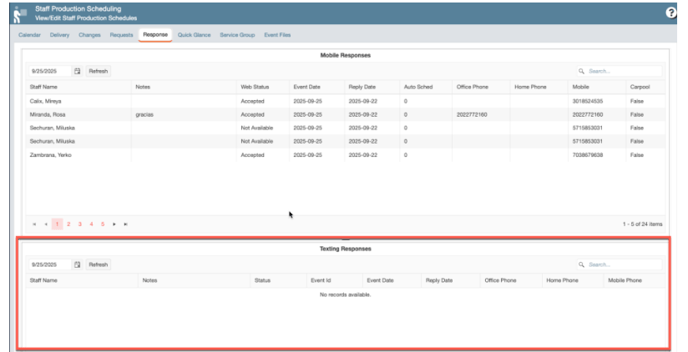
4. Having remove the "Texting Responses" section in the Staff Production Scheduling window:
-
Section Removal:
Remove the "Texting Responses" section from the Response tab. -
Section Resize:
Expand the "Mobile Responses" section to occupy the space previously used by the removed section.

5. Wanting to see **** when a password has been input on the Password field, in order to see if values have been inserted:
-
In the User Information modal within the User Management window, implement masking for the Password field.
- Once a password is entered, it should be visually masked (e.g., with dots or asterisks) to enhance security and privacy.
1. At the top of the screen, on the right side click on the Gear Icon
2. Look for Users Management (second page)
3. Open an existing record or create a new one by clicking on New Users
6. Having the EventID column in the Mobile Responses for better Data Tracking:
- Create a new column called "EventID"
- This column must show the eventid for the event listed in those records.
- The column must be to the right of the "Event Date"


7. Improving the speed when loading records in the Shipping windows:
To improve performance in the following windows:
- Dispatching Shipping Management
- Dispatching Pickup Management
We need to reduce loading times by modifying the search functionality to:
- Only retrieve records within the selected time range,
- Avoid pulling all records from the database, which currently slows down the process.
1. On the left side panel, go to Production
2. Click on Dispatching & Shipping
3. Select Shipping
4. You can either select Dispatching Shipping Management Window or Dispatching Pickup Management

8. Having revamped the Customer Notes in order to provide a better user experience:
Functionality Changes:
- When a user enters a note in the "Primary Notes" field and clicks "Add Note", the note should be immediately added to "Customer Notes"—no need to wait for the "Close" action.
- The "Customer Notes" field must be read-only and support scrolling to view the full note history.
- The "Notes" field in the "Marketing Info" section (within Customer Notes) must also be read-only and scrollable, as it reflects notes from the Customer Task & Notes section.
Placement Changes:
- Reorganize the layout to match the "Last Actions" format:
- "Primary Notes" should appear at the top of the modal.
- "Customer Notes" should be placed at the bottom.
- Increase the size of both fields for better visibility.
1. On the left side panel, go to Sales & Marketing
2. Click on Event & Order Management
3. Select Event Management - All Status Types Included
4. Open an existing event by clicking on the pen icon
5. In the Customer Tab, go to the Marketing Info section, click on the loop icon to add notes


9. Having the WPF columns from the dispatching & pickup window:
- Add the following columns to the "Dispatching Pickup Management Window" & "Dispatching Shipping Management Window"
- Shipper
- Pickup Number
- Pickup Result
- Pickup Date
1. On the left side panel, go to Production
2. Click on Dispatching & Shipping
3. Select Shipping
4. Choose Dispatching Pickup Management


10. Installing requested fonts for report servers:
- The Following fonts were installed in the Root and Stem Proposals:
- Font-Trend-San-Five
- LatinoType-TrenSansOne
11. Selecting days ahead in the future or in the past for the Calendar of the Shipping & Pickup Management Window:
- In the "Dispatching Pickup Management Window" & "Dispatching Shipping Management Window", we need that the Calendar allows the user to select dates way ahead in the future or in the past
1. On the left side panel, go to Production
2. Click on Dispatching & Shipping
3. Select Shipping
4. You can either select Dispatching Shipping Management Window or Dispatching Pickup Management

