1. Elior - Custom BEO/Party Pack Report:
We have received a report to create our BEO reports, which needs to include the following fields:
Page 1:
- Header information (unit name, brand website, unit address, phone number)
- Customer Business Name
- Customer Contact Name
- Customer Email
- Customer Phone Number
- Facility contacts, email, and phone number
- Salesperson Name
- Event Manager Name (2nd Sales Drop Down)
- Food Leave Time
- Key Staff (Captain, Chef, Driver)
- Kitchen Questionnaire Answers:
- Kitchen Family Meal: Y/N
- Kitchen Locations + Set Up (Text field)
- Kitchen Equipment on Site (text field)
- Cooking Restrictions (text field)
- Number of Radios (Text field)
Page 2:
- Event Timeline
Page 3:
- Recipe Name and Alternate Name (Sales Facing Name)
- Allergen/Dietary notes
- Internal production notes (timing of service for each menu item)
- Equipment mapped to menu items
- Tasting notes (open field for each recipe)
Page 4:
- Number of bar locations
- Number of service bars
- Signature cocktails: Y/N
- Butlered items
- Special instructions
- 3rd Party Bev: Y/N
- Bev Therm Water needed: Y/N
- Bar Pack Size
Page 6:
- Staff transportation details:
- Provided: Y/N
- If yes, type times
- Departure time
- Specific guest allergen section
- Outside rentals
- 3rd Party Disposables
- Prior event CRM notes

2. Adding a blocker to limit the user to add a value that does not exceed the varchar 50:
There is a blocker that prevents the user from entering more than 50 characters on the "Event name" field on the Event info tab, "Event type" form chart.
1. On the left side panel, go to Sales & Marketing
2. Click on Event & Order Management
3. Select Main sales view
4. Open an event, go to the Event info tab

3. Needing new changes in some patterns of the recurrence window:
The Recurrence Pattern screen buttons, Ok and Close, now match brand guidelines, the word occurrences was moved up to be in line with the End after.
1. Click Sales and Marketing
2. Click Event & Order Management
3. Access Main Sales View Window
4. Check the box next to any given event
5. Click the drop-down option off of the new entry button on the top tool bar
6. Select copy
7. Click Recurrence - this screen will then open

4. Renaming the "By Event" to "Select by Event" that is located in the Staff Production Scheduling window:
It was renamed from "By Event" to "Select By Event" and can be found in the staff production scheduling window.
1. On the left side panel, go to Production
2. Click on Event Staffing
3. Select Staff Production Scheduling
Before:

After:
5. Changing the position of the side menu options:
A script has been created and run on the cikume tenant to rearrange the "Main View" screens:
- Main Sales View: Now located under Sales & Marketing -> Event & Order Management -> Main Sales View Window (first option under event & ordering management).
- Main Kitchen View: Now located under Production -> Kitchen Management -> Main Kitchen View (first option under kitchen management).
- Main Staffing View: Now located under Production -> Event Staffing -> Main Staffing View (first option under event staffing header).
- Main Production View: Now located under Production -> Event Production -> Main Production View (first option under Event Production).


6. Converting the language field into a drop down with multi-select function:
The Language field on the Staff Person Management screen profile tab is now a dropdown with multi-select functionality. Administrators can populate the list of languages for the drop down in settings.
1. On the left side panel, go to Data Items
2. Click on HR Management
3. Select HR Management (all staff)
4. Click the pencil to open any record
5. Click the profile tab
6. The language option is found here


7. Wanting a new column in the Main Staffing View to access to the Event Files:
A new column has been added to the Main Staffing View, with an icon that opens the Event Files window with the list of files for the selected event.
1. On the left side panel, go to Production
2. Click on Event Staffing
3. Select Main Staffing View
4. A new column has been added with a clipboard icon for each event that opens up the Event Files window


8. Having the color combinations available based on the Event Date condition:
Users can quickly see which color combinations are still available to be assigned, based on the event date.
1. On the left side panel, go to Production
2. Click on Kitchen Management
3. Select Main Kitchen View
4. Navigate to the colors column
5. Click the pencil to assign colors - then drop down the available combinations

9. Needing the Event Type field on the Menu Packages window to be optional:
The Event Type field in Menu Packages is no longer a required field, it is optional.
1. On the left side panel, go to Data Items
2. Click on Food Management
3. Select Menu Packages
4. Open an item or create a new one by clicking on New Entry
5. Go to the Event Type section, here the user has the option to whether or not choose an event type


10. Implementing a new notification following up the Soft Close logic for Empower:
- If a user tries to schedule an event on a day that meets the soft close business rule, they must receive a notification.
- The system should prevent them from booking the event on that day.
- If a user updates an event from a day without a soft close rule to a day with a soft close rule, they must receive a notification.
1. On the left side panel, go to General Set Up
2. Click on Marketing
3. Select Create & Edit Days Pop Up Messages
4. Soft close and recurring closures should be set here as well


11. Implementing a new email template for web order change request resolution:
The app sends an email notification with the change request resolution to both the customer and the catering employee in the following scenarios:
- Change is accepted.
- Change is rejected.
The email notification includes all the information specified in the template.
1. On the left side panel, go to Production
2. Click on Kitchen Management
3. Select Main Kitchen View
4. A pop-up will be displayed, or you can go to the right side on that window and click on Change Request.

12. Having a control to set dynamically the number of rows displayed in a given grid:
It was created an Appsetting that will allow to the users to change the number of items showing per page.
1. At the top of the screen, on the right side you will see the Gear Icon
2. Click on the Gear Icon
3. Select App Setting
4. Look for SetPaginationCountOnOrderDetailsGrid, set the value to Yes
Then
5. On the left side panel, go to Sales & Marketing
6. Click on Event & Order Management
7. Select Event Management - All Status Types Included
8. Open an event by clicking on the pen icon
9. Go to the Order Details Tab, on the Select Items section, you will find the Items per Page feature.


13. Wanting the Images button to be a single button, rather than a dropdown, and included in the Proposal Tab:
The Images drop down on the Order Details tab is now just a regular button - no drop down, the button has been renamed Proposal Images and a button has been added to the Proposal tab.
1. On the left side panel, go to Sales & Marketing
2. Click on Event & Order Management
3. Select Main Sales View
4. Open an Event
5. Navigate to the Order Details Tab
6. See Images Button at the bottom

Proposal Tab:
14. Having the Min and Max Guest Count column in the Event Location dropdown:
Two new columns have been added to the event location drop down, and are populated for On Premise Venues only, those columns are populated with the min and max guest counts, read from the venue seatings entry window.
1. On the left side panel, go to Data Items
2. Click on Venue Management
3. Select On Premise Rooms All Cost Centers - All Status
4. Open a venue, navigate to the configuration tab
5. Click add under the seating header- this has the minimum and maximum fields that should be displayed

15. Implementing Email Validation and Update Process for New and Existing Staff Members:
Once a new staff member is being created, if this staff member is trying to save using an
existing email, then a validation has to run to prevent a new user for using an email assigned to a different staff member.
This change will be applied for all the DB´s in the Cikume Tenant in the Elecate tenant, that
have already the same email assigned (staff members wise), we need to run a script to
change those emails.
1. On the left side panel, go to Data Items
2. Click on HR Management
3. Select HR Management (All Staff)
4. Choose New Entry


16. Making Enable Negative Pricing for Discounts in Data Item Price Fields:
The price field for Food, Beverage, Equipment, and Misc. data items allows users to input a negative number to act as a discount.
1. On the left side panel, go to Sales & Marketing
2. Click on Event & Order Management
3. Select Event Management - All Status Types Included
4. Open an event by clicking on the pen icon
5. Go to the Order Details Tab, add an item and modify the price
Recipe Items:
Equipment Items:
17. Doing some Adjustments to Aging Fields:
The Aging fields are now formatted to display numbers as currency, the up/down arrows have been removed from the aging fields.
1. Go to Finance and Accounting> Customer Financials
2. Select Customer Financial Management
3. Click on the edit icon or double click the customer line
4. On the Contact tab, Scroll down and expand the Financial Recap section
5. Fields referenced are the aging fields on the right
18. Enhancing Returns Option with Event Status Colors, Grid Persistence, and Split Button Drop-Down:
The user should see the Event Status colors as we implemented throughout the application. The user should also be able to utilize the Grid Persistence functionality of grouping, filtering, etc. The Delivery Details and Generate Missing Invoice option should be available on a new split button drop-down for the selected record.
1. On the left side panel, go to Production
2. Click on Returns
3. Select Equipment Returns

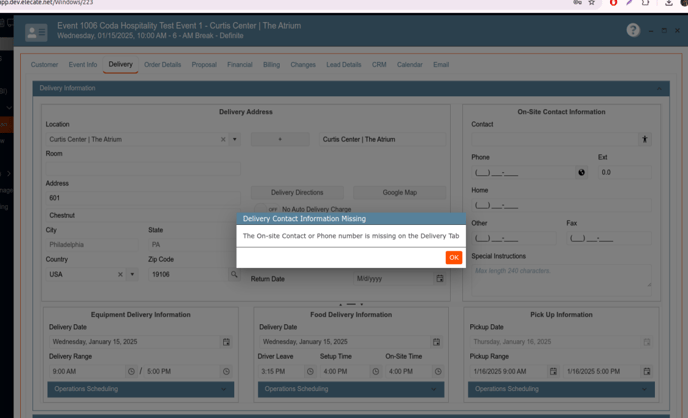
19. Missing Delivery Contact popup message to be reworded:
When the "Required Delivery Contact Information" switch is on in the Set Up Client Menu, a pop-up message needs to appear if the user misses the required fields. The pop-up message should always appear when the switch is on, and the fields are missing
The pop-up message header should say:
- First Line: "Delivery Contact Information Missing"
- Second Line: "The On-site Contact or Phone number is missing on the Delivery Tab"
- Set-up Client:
- Go to the Gear wheel icon in the right options menu
- Go to the Second Page
- May click in the Set-up Client.
- Go to the Food and Beverages rules and then open the Other Options tab.
- Check if the Switch "Required Delivery Contact Information" is on.
- Delivery Contact Information:
- Go to the Sales and Marketing Information
- Click on the Event and Order Management.
- Click in Event Management - All status
- Select Any item and go to the Delivery Tab, you will find the Delivery Contact information fields.
20. Wanting the system to disable the action item buttons based on the Event Payroll Lock Status:
When payroll for an event is locked, the action item buttons for that event are grayed out (read only) on the payroll management window, so that no edits can be made.
1. On the left side panel, go to Finance & Accounting
2. Click on Payroll Processing
3. Select Payroll Management
4. Click the pencil to open an event
5. See the lock/unlock button and referenced columns
Buttons enabled if payrolls are not blocked:

Buttons disabled while the payrolls are blocked:
21. Having the Event Files tab accessible from the Staff Production Scheduling window:
The event files can be accessed from a new place in the staffing section - A tab on the Staff Production Scheduling window. The tab on the Staff Production Scheduling Window will contain:-
- The ability to search by date or event ID (matching the functionality in the Chef's production window)
- The following columns:
- Event ID
- Event Date
- Unit
- Sales Person
- Event Type
- + Icon to open the files
1. On the left side panel, go to Production
2. Click Event Staffing
3. Select Scheduling
4. Choose Staff Production Scheduling
5. Go to the Event Files tab
Search by Event ID:
Search by Date:
22. Renaming the Revenue Group to Revenue Code for Consistency:
The column called Revenue Group on the proposal tab has been renamed Revenue Code.
1. On the left side panel, go to Sales & Marketing
2. Click on Event & Order Management
3. Select Main Sales View
4. Open an Event -> navigate to the proposal tab
Rename the column "Revenue Group" to "Revenue Code"

23. Wanting the Save and Close options, along with others, to be included in the dropdown control of the Recipe Ingredient Information Window:
All tabs of the Recipe Ingredient Information window have the standard Save & Close drop-down option on the save button: Recipe Ingredient & Price, Purchasing, Cost Centers, All Units and Allergens. The Add Allergens and Delete Allergens buttons have been removed from the Allergens tab.
1. On the left side panel, go to Data Items
2. Click on Food Management
3. Select Ingredient Management (All Items)


24. Having the Save and Close option in the Business Unit Setup Window:
When the user clicks the arrow next to the save button, Save & Close will be displayed.
1. At the top of the screen, on the right side you will see the Gear Icon
2. Click on the Gear Icon
3. Look for Business Units
4. Choose Business Unit Setup and select New Entry

25. Resetting the item price at the data item level using the 'Reset Price' toggle in the Event Recipe Order Item window:
The reset price toggle on the event recipe order item screen, when switched ON, resets the price of the item to the price at the data item level.
1. On the left side panel, go to Sales & Marketing
2. Click on Event & Order Management
3. Open an event
4. Add data items that have a price
5. Change the price of the item and save
6. Then, open that data item again and toggle the switch to ON
The new expected behavior is that the price goes back to the data item price

26. Having a switch button to bypass Menu and Beverage Packages pricing:
The toggle will default to the original package mode when set in the Off position. We will not affect existing users with this design change. If the setting is On, we will set the package to "Bypass Package Pricing," which is the desired request from Elior. This change was implemented for both Menu and Beverage packages.
1. On the left side panel, go to Data Items
2. Click on Food Managment
3. Select Menu Packages
4. Open an event or create a new item by clicking on New Entry


27. Creating a new App Setting that triggers the Event Status Change:
It was created an appsetting that triggers the event status change to confirmed based on the following conditions:
- Confirmed by payment via the online portal -> Updates the Status to Confirmed- Paid
- Confirmed by signed contract via the online portal -> Updates the Status to Confirmed- Contract
- Confirmed by payment added to the event record -> Updates the Status to Confirmed- Paid.
1. At the top of the screen, on the right side you will see the Gear Icon
2. Click on the Gear Icon
3. Select App Settings
4. Look for WebAppOnLinePaymentEventStatus

28. Selecting an 'Event Type Division' from a drop down on the Event Type Management Window and Cost Center Revenue Code Setup Screen:
A new codes entry drop-down field has been added to the Event Type Management window, a new drop-down field has been added to the Cost Center Revenue Code window, that has two options- Internal and External.


29. Preventing others from changing the Invoice Notes while the editor is open to avoid conflicts:
There is a warning on the Invoice Notes to inform the user when another user is editing the same notes. If a second user tries to save changes while another user is editing the same Invoice Notes, a pop-up message will appear, preventing the changes from being saved. The pop-up message reads: "The event invoice notes is used elsewhere." When the second user clicks 'Ok', they are returned to the Invoice Notes. The Invoice Notes from the user who first opened the event will be saved.
- On the left side panel, go to Sales & Marketing
- Click on Event & Order Management
- Open an Event record
- Select Event Info, then Click on Notes and on the Event Notes window, select Invoice Notes


30. Seeing a 'CannotDelete' flag on the e-signature attachments from web orders:
It was created a flag from preventing the user to delete attachments in the e-signature, the flag will read as ¨Cannot Delete¨, additionally there is a new column on the ¨Event Info¨ tab, ¨Event Files¨ section with the new created flag.
1. On the left side panel, go to Sales & Marketing
2. Click on Event & Order Management
3. Select Main Sales View
4. Open a customer record (Pencil icon)
5. Go to the Event Info tab
6. Event files section

31. Implementing front end validations for the required fields in the Beverage tools:
The information was validated on the frontend before sending the information to the backend. A banner will show on the top of the modal with the validation message. For instance, instead of “The rec_tsel field is required”, it should say “The Selling Price field is required”.
1. On the left side panel, go to Data Items
2. Click on Beverage Management
3. Choose Select Beverage
4. Select Beverage Management (All Items)
