1. Creation of a new skill type in the modal window.
There is a column for skill types called ¨Description¨ in the DB, however once a skill type is added, the column is not reflecting the information, so it was created in the UI a ¨Description¨ field text, that will link the ¨Description¨ column in the DB.
1. Go to the left side panel and click on General Setup
2. Select Staff
3. Click on Create and Edit Skill Type
4. Choose an existing record, check the GL/ Payroll Export ID and Description
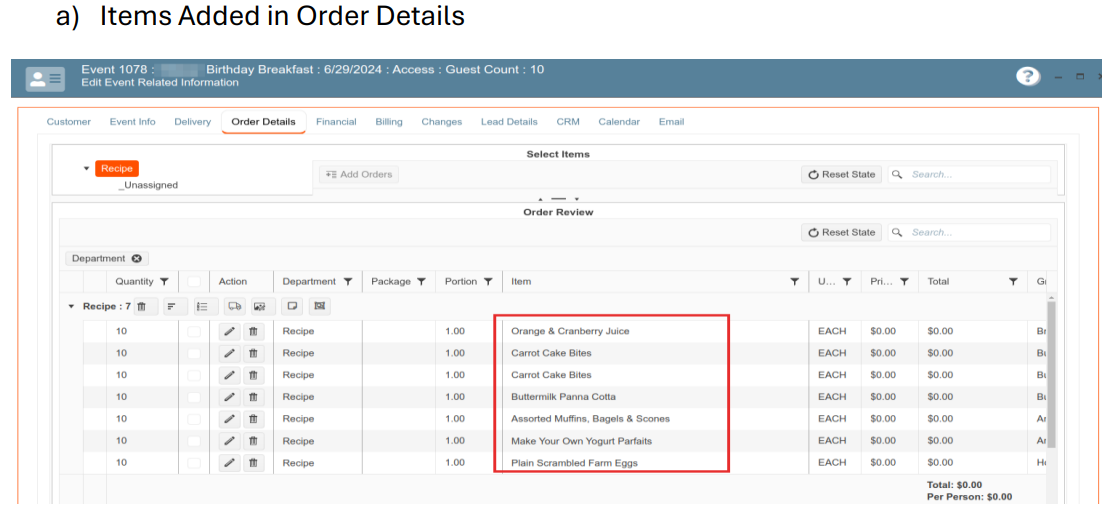
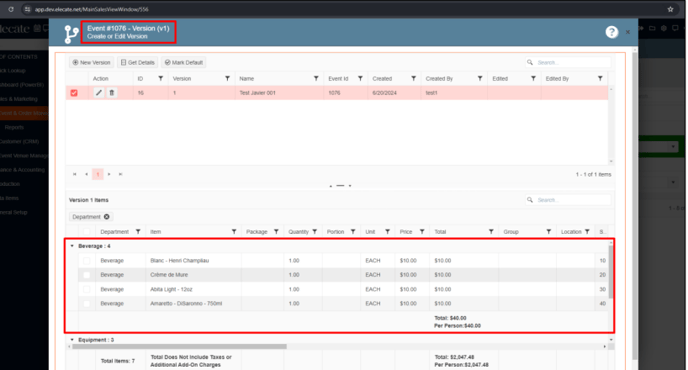
2. Adding Items from Order Details to Menu Builder.
If the user adds items from order details and tries to see the same items from the menu Builder, they are not able to visualize the information.
It was added two dropdowns in the Crud editor for Recipes and Beverages to select Course Type and Section, dropdowns are optional. These functionalities added will help to display and organize the information on the Menu Builder, so the user can identify where the items were added.
1. On the left side panel go to Sales & Marketing
2. Click on Event & Order Management
3. Select Event Management - Confirmed Orders Only
4. Select an event, then go to the Order Details tab
5. Add items to the event, select the Course type and Section
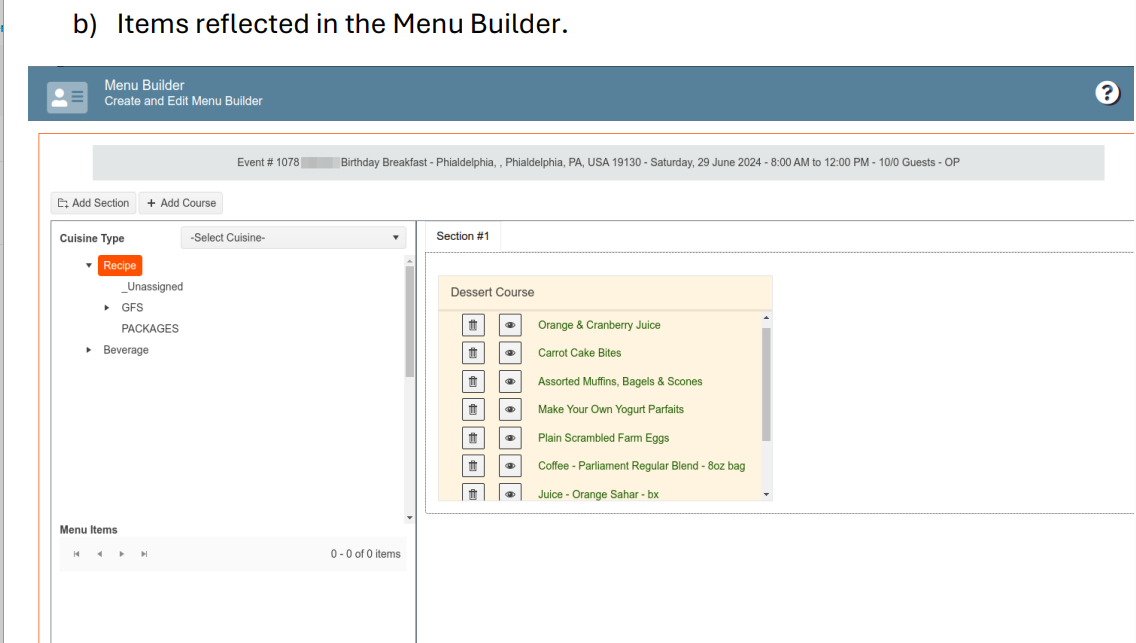
6. Once this process is completed
7. Go back to the Sales & Marketing tab
8. Click on Main Sales View Window
9. Choose the event where the items were added
10. Click on the second option, next to the pen icon ![]()
11. Menu Builder will display the items added through the order details tab with the course type and sections selected.
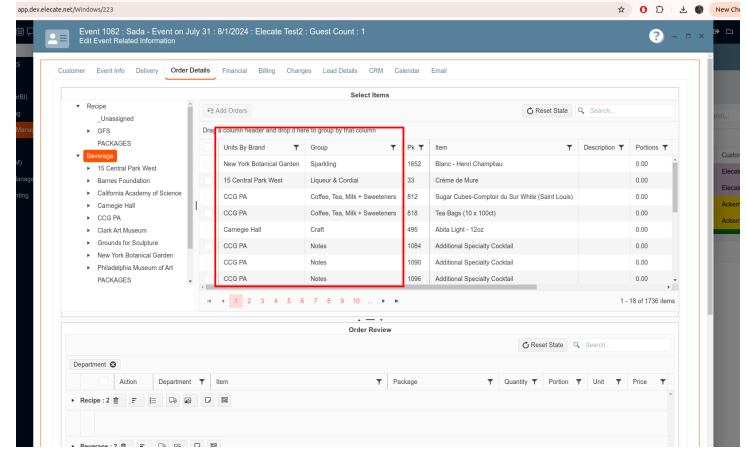
3. Creation of 2 columns called: ¨Unit¨ and ¨Group¨, these columns will be added to the order details:
2 Columns were added to the order details tab on the top grid view, these are called: Unit and Group, the columns are visible when you select one of these categories: Recipe, Beverage, Equipment, Miscellaneous and Staff. Group column is visible only when the department root node in the tree view is selected.
1. On the left side panel go to Sales & Marketing
2. Click on Event & Order Management
3. Choose Event Management & All Status Types Included
4. Select any event on that window
5. Go to Order Details tab
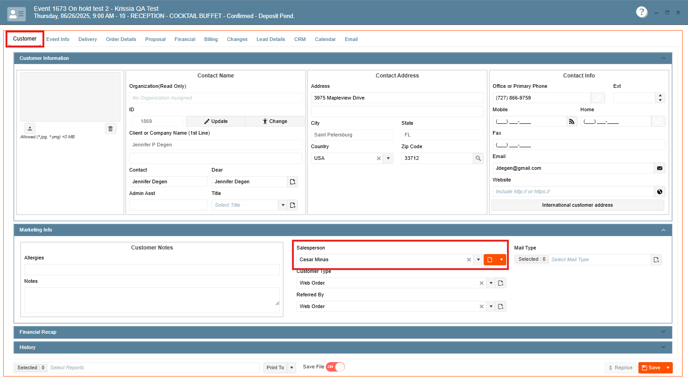
4. Creation of the Salesperson button:
If you try to select a salesperson in an event, this option is not available, so it was created an orange button with a dropdown menu, where the user has the option to either select the salesperson or split the commission.
1. On the left side panel go to Sales & Marketing
2. Click on Event & Order Management
3. Select Event Management - All Status Types Included
4. Select an event
5. In the customer tab, look for Marketing info
6. Here you will find the option that says: Salesperson
7. Click on the orange button
5. Visualize the staff member´s hours in format of 12 hours:
If you select a staff member for an event and set the schedules, this can be seen in 24 hours format, so this was changed to 12 hours.
1. On the left side panel, go to Sales & Marketing
2. Click on Event & Order Management
3. Select Event Management - All Status Types Included
4. Choose and open an event
5. Go to Order Details
6. Add Staff members to the event, select the schedule start or end

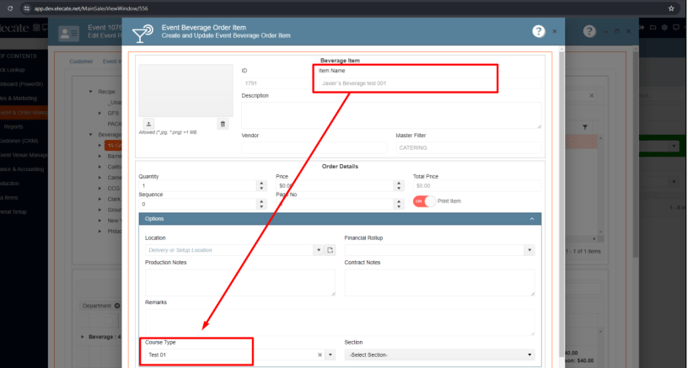
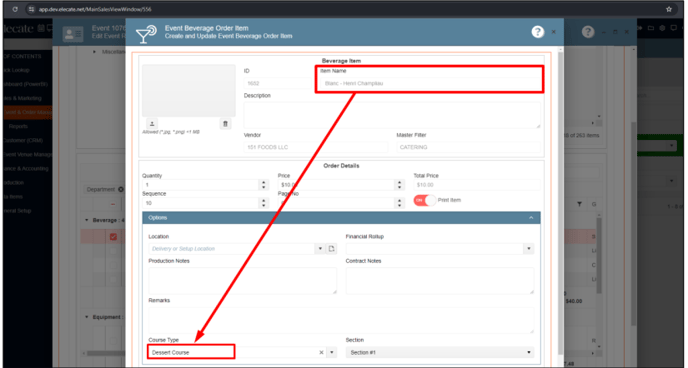
6. Working with Beverages in the Menu Builder on the backend side:
It was added a ¨Course type¨ field in the management editor and event crud (backend), a validation was made for ¨CourseType¨ in the revision sections, a column section was added for beverages once it comes to the event crud editor.
1. On the left side panel, go to Sales & Marketing
2. Click on Event & Order Management
3. Select Event Management & All Status Types Included
4. Open an event
5. Go to the order details tab
6. Add Beverages and close & save the event
7. Go back to the Sales & Marketing tab
8. Click on Main Sales View Window
9. Choose the event where the items were added
10. Click on the second option, next to the pen icon ![]()
11. Menu Builder will display the items added through the order details tab with the course type selected.

7. Creation of a new flow for adding items in the Main Sales View Window:
Implement an automated status management system for seamless order handling across departments.
- Initial Status: Default orders to "Not Started" or "New."
- Automated Updates: Status changes automatically based on user actions (e.g., "Sent" when the user hits send).
- Sales Simplicity: Prevent manual status updates to avoid errors.
- Permission Control: Freeze status changes for non-responsible user groups (e.g., Culinary can't move a menu to "Submitted"; only Sales can).
- Workflow Restrictions: Restrict editing permissions to the current handling department. Sales can edit only after permission from the operating department, changing the status to "Returned."
- Edit Permissions: Allow Sales to request editing permissions, marking the order as "Returned" for editing.
Create a new "Status" column in the Main Kitchen View for culinary users to manage order acceptance and rejection. - Column Creation: Add a "Status" column in the Main Kitchen View.
- Dropdown Options: Include two options in the dropdown:
- In - Production: Culinary users start working on the event; sales cannot make changes.
- Returned: Order goes back to sales for necessary adjustments.